


Introduction
For over 6 months, I was a crypto research analyst for PrimeDAO gathering data about the validity, authenticity, and relevance of different web3 protocols presenting my analysis to users of the information so they can make better, more informed decisions. Beyond the regular compensation for a job well done, we were given POAP NFTs. I’ve heard of NFTs before but getting not just one but 4 of them got me really interested.
POAP NFTs are NFTs issued by a Proof of Attendance Protocol to participants for performing a special activity, or task, in my case, writing stellar crypto reports. This happens regularly in the web3 space, hence, the need to educate you on what they are, their value, and how to build and deploy your collection of NFTs.
There are two types of tokens recognized in the crypto space which are fungible and non-fungible tokens. This article focuses on non-fungible tokens and how to develop and deploy them in an instant as a beginner in solidity.
This article is for beginners who are just finding their way around solidity or for intermediate-level solidity developers who need a refresher on how to build an ERC721 NFT. You do not need to set up any complex coding environment to do this. You can use an already-made IDE to build and ship your ERC721 contract.
What are tokens & NFTs?
Before we begin coding our smart contract, a basic understanding of what tokens and NFTs are is important. Tokens are digital assets recognizable on the blockchain and they are of two kinds, Fungible and Non-Fungible tokens. In traditional finance, when an asset is described as fungible, it means it can be exchanged from one form to another, and it would still retain its value. A good example would be the Nigerian currency. NGN1000 can be exchanged for two NGN500 and the value won’t change. The opposite of fungible is Non-fungible which is used to describe an asset that has unique qualities and value. A Monalisa painting, for example.
NFT is a combination of two words, Non-Fungible and Tokens. NFTs are "one-of-a-kind" assets in the digital world that can be bought and sold like any other piece of property, but have no tangible form of their own. Think of NFTs as certificates of ownership for a virtual or a physical product.
What is Openzeppelin’s ERC721 NFT standard?
In the smart contract development space, there are ways and patterns of smart contract development, agreed upon to ensure uniformity. These agreed patterns are referred to as standards.
Openzeppelin is a big driver of uniformity and security in the smart contract development parlance and they have developed different token standards to include the minimally required functions for both fungible and Non-Fungible tokens. Arguably, two of their most popular standards are the ERC20 (for fungible tokens) and ERC721(Non-fungible tokens).
Getting Started
This article as mentioned earlier requires you to have basic knowledge of solidity.
Setting Up Your Environment
For simplicity and easy access, we would be using an online Integrated Development Environment (IDE). Remix IDE is an online IDE used by experts and beginners alike. It is a no-setup tool with a GUI for developing smart contracts. Remix is also really easy to use.
What all that grammar translates to is that, unlike other complex IDEs, Remix IDE gives you an interface to interact with, which will be very handy when we deploy this smart contract.
Creating Your Contract in Remix IDE
Creating a contract in Remix is not difficult. You can create a new contract by following these steps:
Visit Remix IDE website to access the development environment.
Create a new file. You can name this file whatever you want but it is best practice to give your contracts a name that relates to its purpose. For example, POAPContract.sol.
Initialize your contract and add the code shown below.
//SPDX-License-Identifier: UNLICENSED
pragma solidity ^0.8.0;

contract POAPContract is ERC721URIStorage { }
Note: The first line is a comment syntax to indicate what license accompanies the contract. This contract is labeled unlicensed. Most contracts have an MIT license or custom license found in their contract files. Of course, there are other licenses too.
Importing and Implementing the ERC721 standard
For this example, you’ll need to import two contracts from the Openzeppelin library. The first is a counter library that helps you label every NFT in your collection with a unique ID. The second is an ERC721URIStorage contract which allows us to do more than create an NFT collection, it also allows us to record other information about the NFT like the link to the details of the NFT or some other detail.
//SPDX-License-Identifier:UNLICENSED

pragma solidity ^0.8.0;

import "https://github.com/OpenZeppelin/openzeppelin-contracts/blob/master/contracts/token/ERC721/extensions/ERC721URIStorage.sol";
import "https://github.com/OpenZeppelin/openzeppelin-contracts/blob/master/contracts/utils/Counters.sol";

contract POAPContract is ERC721URIStorage{
    using Counters for Counters.Counter;
    Counters.Counter private _tokenIds;

}
Import the contracts as shown in the image above. Import statement should be added after the pragma line.
Implement the library with the
using-forkeyword.Create a counter variable that will track the unique ID of each NFT in the collection. This ID will be incremented during mint and decremented during a burn operation. This is to prevent the collision of NFT IDs.
After doing all of the above, we need to add some functions starting with the constructor.
contract POAPContract is ERC721URIStorage{
    using Counters for Counters.Counter;
    Counters.Counter private _tokenIds;

    address public owner;

    constructor(string memory name, string memory symbol) ERC721(name, symbol){
        owner = msg.sender;
    }

    modifier onlyOwner() {
        require(owner == msg.sender);
        _;
    }

    function awardAttendee(address to, string memory tokenURI) public onlyOwner{
        uint newItemId = _tokenIds.current();
        _mint(to, newItemId);
        _setTokenURI(newItemId, tokenURI);
        _tokenIds.increment();
    }

}
Create an owner variable that tracks the address of the one who deployed the contract.
Create a constructor that will be used to set the name, symbol of the NFT collection, and owner address.
Create a modifier to check that the sender of a transaction is the same as the owner of the contract.
Add a function to award the awardees the NFT. This function has an onlyOwner modifier to ensure that the contract can only be called by the owner. The function takes the address of the receiver and any additional information (e.g. links or text) as strings of text.
The unique ID of the NFT to be minted is deciphered by calling the current() function in the counter library contract. The return value is stored in a uint variable called newItemId.
setTokenURI is another token provided by the counters library that allows us to attach additional information to the unique ID.
Deploying your NFT Contract in Remix
Once you are done developing the contract, the next thing you have to do is deploy it. Luckily for us, Remix has an interface that allows us to interact with our deployed contract.
To deploy, do the following:
Click on the deploy section on the left side of the screen to open the deploy interface.
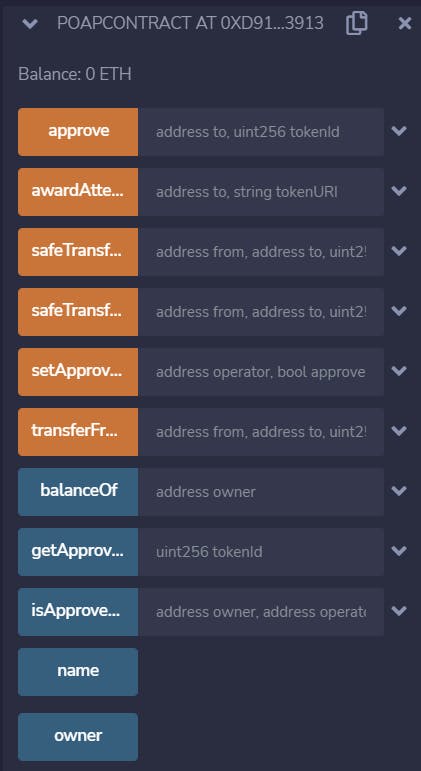
Input the name of the NFT collection and its symbol, then deploy. You should be able to interact with your contract now. You should see more functions other than the awardAttendee function. This is because we inherited the functions in the ERC721 standard.
Conclusion
With this, you should be able to develop and deploy your NFT collection with ease. For more content like this, you can connect with me on Twitter or LinkedIn. Watch out for the next content. Cheers.
You can access the entire code here.